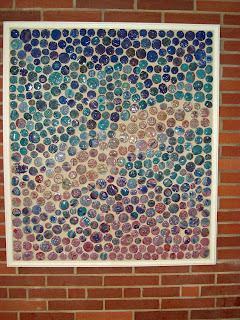
The blog backdrop is a closeup of our footprint mural that we created last year. This is the finished mural, which hangs outside the main office.
The great thing about the mural is that everyone was a successful part of it--all of the students in the middle school created one small piece for it, and can pick out their work. The not-so-great part was cleaning grout off of all of those great textured grooves. Here's how the mural was made:
First, students rolled a small ball of red clay.
The students carefully imprinted the clay by pressing into it with the bottoms of their shoes.
The clay was fired, and then students selected from a limited palette of glaze colors. Turquoise and light blue were the most popular colors. The beige, not so much.
The finished pieces were spread out onto a 1/2" thick piece of plywood. The design was determined by how many pieces we had of each color.
The pieces were glued onto the plywood with mosaic glue, and then grouted. I don't have any pictures of that part of the process because I thought the mural was ruined by that point--grout covered the entire surface and seemed impossible to get off!
As you can see in the closeup, though, everything grout-related turned out okay. My tip for getting grout out of textured clay is to use lots of vinegar scrubbed on with a toothbrush, and occasional picking with a wooden skewer. Make sure you have a friend to help--it takes a lot of elbow grease!
See the words on those pieces? Here's the quote:
"So be sure when you step. Step with care and great tact. And remember that life's a Great Balancing Act. And will you succeed? Yes! You will, indeed! (98 and 3/4 percent guaranteed)"
--Dr. Seuss (Oh the Places You'll Go!)
This is printed on several of the beige pieces, and meanders across the mural from left to right. The phrases were printed onto transfer paper, and then attached to the clay pieces and sprayed with fixative. They are hard to spot from a distance, so they're a bit of a reward for those who stop to take a closer look.
The whole mural was framed and then hung onto the brick wall. It is very, very heavy. We made sure to leave five empty spaces--four placed inside the corners and one in the middle--for screws. Clay pieces were then glued over the screws and grout was added.


No comments:
Post a Comment